Using the Map View
Map View (or Map) is a real-time graphical display of the ActiveBatch workflows and their objects with a specific emphasis placed on Plans and/or Jobs.
Map is used by job authors to create jobs and plans and establish relationships between those objects. ActiveBatch operators can also use Map to monitor actively running jobs and plans since the view offers real time status updates.
The Map view can be accessed at the Job Scheduler (root) level to see the entire system; or, at the Plan or Folder level to see objects recursively from that level.
Map view allows you to create and manipulate various ActiveBatch objects. It is the predominant view for graphically creating workflows. Jobs and plans can be linked together using constraints, completion triggers, and alert triggers. In Map view, your Jobs and their relationships to other Jobs in the system can be visually seen and graphically managed.
What you see in the Map view canvas area are Folders, Plans and Jobs. You can expand a folder or plan to see the contents within them, which is limited to nested folders, jobs or nested plans. The canvas area does not display shared objects (e.g. queues, user accounts, schedules, etc.). That information can be seen using the Child Objects or Associated Objects panels, depicted on the left in the image below.
/wc189.png)
When the Map View is first launched, you will see the larger portion of the canvas containing whatever workflows and objects can fit in the window and a smaller “context” window in the upper right-hand corner (Map Overview) that displays the entire level. This smaller window allows you to pan and bring other objects into view. Map supports both pan and zoom. All shapes and text will scale as you zoom in and out. Three (3) dockable panes on the left are: Child Objects, Associated Objects and Pinned Objects.
Note: If you do not see any or all of the above described smaller windows (Child, Associated and Pinned objects), click on the far-right gear icon in the Map view toolbar, then select View. From there, select the desired window.
Child Objects refers to those objects at the currently selected level that are not Jobs or Plans. In other words, all of the rest of the ActiveBatch objects that reside at the level you are viewing. Child objects appear in this pane by selecting the container you would like to see this information for.
Associated Objects contains the list of objects that are associated with a selected objects. For example, a Queue and User Account object would minimally appear here for a Job. To see associated objects, you must click the "Get Associated Objects" icon (a "chain link" icon) on the container you are viewing.
Pinned Objects depicts objects in both the Child Objects and Associated Objects panes that a user has pinned. You can pin an object that you will be using regularly. Think of pinned objects as a type of favorites for the Map view. If you pin a Plan or Folder you can also easily access the underlying nested objects in the container.
To learn more about specific features of the Map View, expand the desired option below.
The top row contains a tool bar with various buttons that control various Map view actions.
/wc190_458x28.png)
The tool bar is arranged in logical groups. From left to right:
-
Updating
-
Refresh. This button will cause a complete refresh of the Map view.
-
Freeze updates. This button, when enabled, will stop auto-refresh updates from changing the view. This can be useful when you are designing a workflow that may also be executing.
-
-
View History Traversal
-
Left and Right arrows. These buttons allow you to traverse previous and next views from your recent history of using the Map view. This is useful when you need to go to a different level or Map area and then return back to what you were looking at.
-
-
Zoom
-
Zoom In. Zoom to Fit. Zoom Out. These buttons allow you to view the images larger and closer, or auto-adjusted so the images fit in the view, or smaller and further away.
-
-
Reset Layout. This button is useful when you have made some changes to the view and want to have the smart layout reset your view.
-
Get Associated Objects. Clicking this button will retrieve all objects that are associated with objects at the level selected and populate the “Associated Objects” pane.
-
Pan
-
Pan Mode. Select Mode. Zoom Mode.
-
-
Search. This allows you to search the view for a specific object (Job, Folder or Plan). Any matches are listed under the search textbox. Double-click on the desired search result. When doing so, the Map view will set focus to that object.
-
Collapse All. This collapses (closes) any open folders or plans.
-
Gear. This is Map View settings, which allows you to show or hide certain aspects of the view.
This section discusses what you can expect to see when hovering over an object or instance in Map View. Map View’s use of tooltips provides you with a quick way of obtaining more information without cluttering the display.
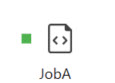
The example image above is a job object. The job object consists of the following from left to right, top-to-bottom. First, the green box is called the accent stripe. It indicates the status of the last completed execution of the job. The icon is color-coded and follows the standard use of ActiveBatch colors (i.e. green=success, red=failure, purple=abort). A larger accent stripe indicates that the job is actively executing (and when executing, the color is blue). Next, the icon to the right of the accent stripe depicts the job type (Process, Script or Jobs Library). In this example, it is the Process icon. At the bottom of the image is the name of the object.
Job, Plan and Folder definitions provide a simple tooltip that indicates the ID and path of the object, as depicted in the image below. This is seen when you hover over the icon that represents the object type. If the plan or job runs based on a schedule, the "Next Run" tooltip will display the next run date and time.
/wc191_472x131.png)
Hovering over the accent stripe (which is green, in this example) provides information about the last completed instance.
/wc192_418x148.png)
Hovering over the green arrow depicted below describes a configured completion trigger. You will see something similar for job constraints, when configured.
/wc193.png)
This section lists hotkeys supported by the Map View.
| Key Descripton | GUI (AbatConsole) |
|---|---|
|
Delete Object |
DELETE |
|
Cut |
CTRL + X |
|
Copy |
CTRL + C |
|
Paste |
CTRL + V |
|
Rename object Name & Label |
F2 |
|
Expand Container |
+ |
|
Collapse Container |
- |
|
Collapse All Containers |
SHIFT + ‘-‘ |
|
Script Editor/Job Step Editor |
Double Click on Icon |
|
Property Sheet |
ALT + ENTER |
|
Search Bar |
CTRL + SPACE |
|
Fit to zoom |
ALT + F |
|
Drag Zoom |
ALT + Z |
|
Panning |
ALT + C |
|
Select Mode |
ALT + X |
|
Pin |
CTRL + SHIFT + P |
|
Un-Pin |
CTRL + SHIFT + U |
The Map View area is separated into two (2) sections: Overview and Canvas. The Overview or smaller box shows your entry level and all subsequent levels downward. We say “entry level” because that term describes the level you entered the Map View. If you click “Map” at root level, then the entire ActiveBatch system is available (assuming root level is the Job Scheduler and not a virtual root![]() connection). If you click “Map” as a result of right-clicking on a selected Folder or Plan, then your entry level will begin with the Folder or Plan.
connection). If you click “Map” as a result of right-clicking on a selected Folder or Plan, then your entry level will begin with the Folder or Plan.
Overview Box
The Overview box is useful for panning to an area of ActiveBatch that isn’t visible in the larger canvas. You can turn the Overview box on or off, via the Settings “gear” on the Map Toolbar, then selecting View > Map Overview. You can also remove the Overview by clicking on the “x” in the upper right hand corner of the box. In addition, you can grab the box by the title and move it to a more appropriate place if the box itself is overlaying something you need to see. The Overview Box is a dockable pane so it can be moved and docked to a more suitable spot if needed.
The above figure is a Map display of a Scheduler at root level. A single purple line in the Overview box indicates you see all of the items in the canvas area. If you see two purple lines in the Map Overview box (see below), it means that is what is currently visible to you in the canvas area. You can vertically scroll or pan within the Overview area to see what isn’t currently visible.
/wc194.png)
Note: At the entry level only, if all the Plan or Job objects are standalone and contain no relationships (i.e. completion triggers or job constraints). Map View will stack all the Job and Plan objects for easier initial display.
Canvas
The Canvas contains the area for object display. Map View only displays Plans, Folders and Jobs in the Canvas area. Other objects are displayed in list fashion within the other dockable panes named Child Objects and Associated Objects.
Jobs are easy to see. A Job consists of an icon which reflects the type of job it is (i.e. Process, Script or Jobs Library) with the name of the job underneath the icon. The color icon to the left of the job type indicates the state of the job as it last ran. Green means success, red is failure and purple is abort.
A Plan or Folder consists of a box drawn around it with an open/close icon. To the right of that is an icon that represents the object type (Plan or Folder), followed by the name of the object.
/wc195.png)
If you select an object, a blue bold box is drawn around it to visually indicate the object that is selected. In the above image, TestJob is the currently selected object. You can multi-select objects through the standard Windows hot key of Ctrl.
Clicking on the FTP BankA Plan in the above image causes that object to open and to display all the underlying Plan/Folder/Job objects within it. In this example, there are two jobs in the plan, and that is all. If there were nested folders or plans, you would see them as well.
All Plan object contains three (3) tools in the upper right portion of the box. From left to right, the tools are: Optimize Workflow, Get Associated Objects, and Reset Layout. The Folder object contains (2) tools, Reset Layout and Get Associated Objects. These options are described in following sections.
In addition to the Canvas area, three (3) separate dockable panes are provided to allow for simple and easy association of objects. While the sub-sections that follow describe each pane in greater detail, the common purpose all three panes share is the ability to drag and drop. If you drag and drop an object from the Child Objects or Associated Objects pane to the Pinned Objects plan, the object is pinned. Pinning an object allows for fast and easy reference to the object for association or other purposes.
Note: If you do not see any or all of the above described panes (Child, Associated or Pinned), click on the far-right gear icon in the Map view toolbar, then select View. From there, select the desired pane.
Child Objects Pane
The Child Objects Pane is a dockable pane that displays all of the objects that are not jobs, folders or plans that are present in a container object. The Child Objects pane is automatically populated when a container object is selected.
/wc196_1280x506.png)
In the above figure, the Folder “Shared Objects” is selected. One of the ActiveBatch recommendations is to store your non-Job/Plan/Folder objects into a separate folder named “Shared Objects” (or something similar) for ease in locating those types of objects. When Shared Objects is selected, the Child Objects pane is auto-populated. Child Objects will be automatically populated whenever a container object is selected (when a job is selected, Child Objects is not updated). You could then (optionally) drag-and-drop any of the listed objects to any object that is visible in Map View (assuming your security permissions allow for this).
Associated Objects Pane
The Associated Objects pane is a dockable pane that, upon request, displays all objects that are associated with the current level selected and its child objects, one level deep. For example, if you click on a Plan in the canvas area, then click on the Plan's get associated objects icon (the chain) - the associated objects pane will include objects associated to the plan (if any), and objects associated to its immediate child jobs. If there are nested plans, their child object associations won't be displayed unless you select the nested plan and get its associated objects.
In the image below, the FTP BankA plan was selected in the Map View canvas area. You can tell as a blue box has been drawn around it. The chain icon outlined in red, next to the plan name, is the icon used to get associated objects. When doing so, the associated objects pane includes FTP BankA's "Plan Alert" (alert object) association. It also displays its child job names and the objects the jobs are associated with.
/wc197.png)
Next, in the image above, to the right of the Plan Alert, is a yellow icon that when you mouse over it, reveals a tooltip stating "Disassociate". This feature allows you to disassociate non essential shared objects from the object using it. An alert object is not required to be associated to a plan, therefore you are allowed to disassociate it by clicking on the yellow icon. You will be prompted to confirm the disassociation. The system will only allow disassociation for non-essential shared objects (the yellow icon will not appear next to an object if it cannot be disassociated). For example, you cannot disassociate a queue object from a job since the queue is a required object that must be associated to every job.
Map View provides two (2) methods for requesting a list of associated objects.
The first method is the Plan/Folder get associations "chain" icon discussed above. The same icon is present in the Map View's toolbar, and if you click it there, the Map view will display associated objects at the entry level at which you entered the Map view. For example, if you right click on a plan in the Navigation pane, then select View > Map, then click on the Map View's get associations chain icon, you will see objects associated to the plan and its immediate child objects.
Pinned Objects Pane
The Pinned Objects Pane is a dockable pane that displays all pinned objects. Pinned objects are those you would typically want to associate to jobs and/or plans or otherwise quickly access. So think of Pinned Objects as a type of “favorites” for the Map View.
You have several methods for pinning an object to this pane.
First, you can drag the object from either the Child Objects or Associated Objects panes and drop it into the Pinned Objects pane.
Next, you can drag the object from the Navigation pane and drop it into the Pinned Objects pane.
Last, you can right-click on an object and look for the “Pin” selection. This will explicitly pin the object.
/wc198.png)
The above figure shows two (2) objects pinned. The first is a folder named Shared Objects.
/wc199.png)
Pinning Folders or Plans can be very useful because you can then expand the container to access the nested objects. The figure above shows a sample of objects when Shared Objects is expanded.
To unpin an object, simply click on the Pin icon to the right of the object. That will unpin the object from the pane.
To find a specific object within the Map View canvas area, we’ve provided a built-in search capability. There are two (2) methods for accessing search. Either click on the Search icon in the Map View toolbar or press the Ctrl space hotkey and the search bar will appear. You may click on the stylized “x” to the right of the Search bar (or press the Escape key) when text is present to clear that text. To remove the Search bar (with no text present), press the Escape key.
/wc200.png)
The Search Bar allows you to enter a partial name or label of an object. As you enter the data, the search will, in realtime, display matching possibilities. Double-clicking on a matching entry in the search results will cause that object to come into immediate focus and highlighted in the canvas area. Using the above search results, if you double-click on the last item in the list, the canvas area will set focus to that job, as depicted in the image below.
/wc201.png)
Map View allows you to traverse previous views (zoom, pan, expand, collapse) through the use of the left and right arrow buttons found on the Map View Tool Bar. This can be very handy when you’ve needed to search for something and then return to the same view you were originally working on.
This section describes how you can manage (add/modify/delete) Completion Trigger and Job/Plan Constraints using the Map View.
To create a new workflow or to add objects to an existing workflow, right click anywhere in the white space of the canvas area and select New… and then Folder, Plan or Job. This will bring up the usual property dialogs appropriate for the object to be created. You may create any ActiveBatch object you like, however, only Folders, Plans, Jobs and Reference Objects are visually displayed in Map View canvas area. The other objects can be seen in the Child Objects pane (and of course in the Navigation tree).
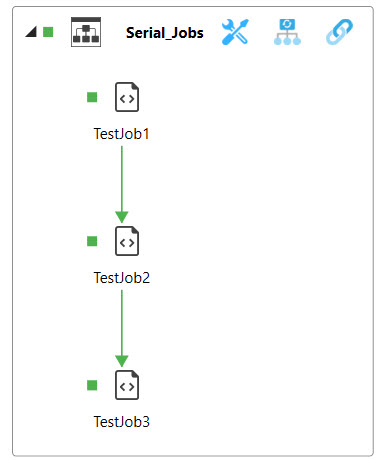
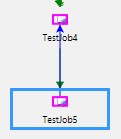
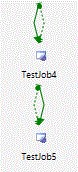
For the purposes of this section, let’s assume we have a Plan named SerialJobs with four (4) jobs named TestJob1 through TestJob4. Each job is to be executed sequentially. In this example, let’s illustrate the steps necessary to add TestJob5 to the mix. The above figure shows what the display now looks like. Right-clicking on the white or empty portion of the canvas brings up a menu which in this case allows us to create a new object within the SerialJobs plan. Assuming we create a new job named TestJob5, the display will appear as follows. TestJob5 appears on the lower right and is not yet part of the workflow.
Adding a Completion Trigger
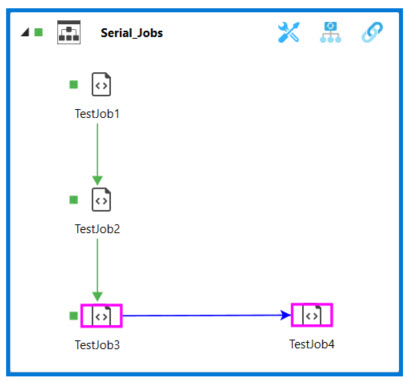
To create a relationship between TestJob4 and TestJob5, you need to left-click on TestJob4's object type icon and hold the mouse dragging the purple box to the desired target object (TestJob5). In the figure below, the arrow is being drawn from TestJob4 to TestJob5.
When released, the “Add Completion Trigger/Constraint” dialog appears, as depicted below. ActiveBatch needs to know what type of relationship is being requested. If you are creating a Completion Trigger, this means that when TestJob4 completes you would like TestJob5 to trigger. Alternatively, if you want to create lots of Completion Triggers, you can press the Ctrl key down and drag the line. This action will create a Completion Trigger line.
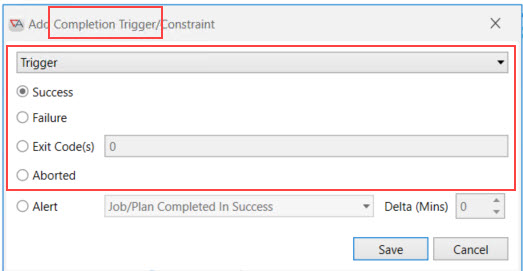
You can select the condition of the completion trigger. This means you can specify that the object’s completion status of success (default), failure, a specific error code(s) or aborted determine whether to trigger the next object (Job or Plan).
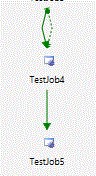
Assuming the default Success condition is selected, the relationship is shown as a green (success) arrow pointing to TestJob5. This means that when TestJob4 completes successfully, TestJob5 should begin execution.
Adding a Constraint
A Constraint or pre-condition may also be drawn as a relationship. For example, if you draw a relationship arrow from TestJob5 to TestJob4 (the reverse direction from what we did as part of the completion trigger), you can select a Constraint.
This would mean that TestJob4 must complete successfully before TestJob5 can execute.
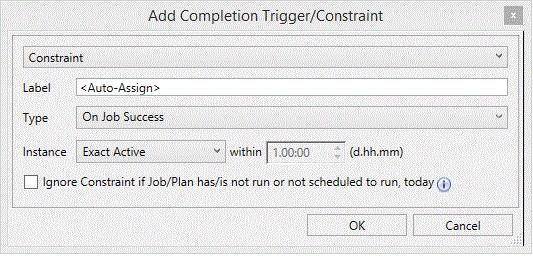
The relationship arrow is a green dotted line indicating a constraint.
The Constraint example depicts how to create a job constraint using the Map View. When it comes to configuring a sequential workflow, using completion triggers to trigger one job after another will work just fine; no job constraints are needed. Whether to use only completion triggers or constraints - or a mix of both - will depend on the workflow.
Let's look at a constraint example.
-
Assume there are 4 jobs in a plan, and the plan is what is triggered.
-
The first 3 jobs can run in parallel, but the 4th job must wait for the first 3 jobs to complete successfully before it can run.
-
To accomplish this, add 3 job constraints to the 4th job, using the method described above. When configured this way, all 4 jobs will instantiate (an instance will be created) when the plan triggers.
-
When the plan is triggered, three jobs will go into an executing state since they can run in parallel, and the 4th job will go into a waiting constraint state. This will work fine.
-
However, if you would rather the 4th job not instantiate immediately when the plan triggers (it will be in a "not run" state initially)
-
Keep the above described constraints, but new to the mix is the addition of a completion trigger - set on one of the 3 jobs that run in parallel - to trigger the 4th job.
-
Add the completion trigger to the job that historically runs the longest out of the 3. This way, it is more likely that the other two jobs will already have completed by the time the completion trigger occurs, resulting in no wait time for the 4th job before it starts executing (since the constraints for all three jobs will be satisfied by the time it triggers).
-
-
Adding a completion trigger in this scenario is not necessary, but it will reduce the amount of constraint logic rechecks the Scheduler has to do when a job is waiting on a constraint.
-
Modifying Triggers and Constraints
In the previous sections we created a Job and discussed the addition of completion triggers and constraints. This section describes how to manage the links.
To modify or delete a link, simply select and right-click on the link you want to edit or remove.
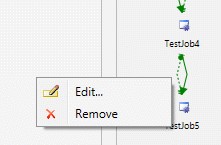
A menu appears allowing you to Edit the trigger or constraint, or Remove the link.
Note: Remember that if you remove a constraint you must still ensure the constraint label has been removed from the Constraint Logic property. This property is located on the Constraints property sheet. Missing constraints whose labels still remain in the Constraint Logic property are considered failed constraints.
The previous sections of this chapter discussed the various pane and canvas areas that make up Map View. We’ve also looked at those operations that create and maintain object relationships. This section will discuss Map View operations themselves and how you can make the most of the Map View graphical interface.
General
When selecting objects for any of the operations below, you have a great deal of flexibility as to where to select the object. You can drag an object from the Navigation pane, any of the Map view panes as well as the canvas area.
Moving Objects on the Canvas Area
To move an object around on the canvas, simply select the object and left-click on the object’s name while moving the object to a new spot on the canvas. When you drop the item and then click off of it, the object will be moved and a re-layout will occur. Note that this type of move does not change the object’s path. In other words, you aren’t moving the object from one container to another.
Moving Objects
To move an object from one container object to another, you need to hold down the SHIFT key and then select the object on the object’s name. When you move and drop the object on another container, the object will move from one container to container. This action will result in the object’s path changing.
Copying Objects
To copy an object and drop the copy into a container, hold down the CTRL key and then select the object on the object’s name. Now when you move and drop the object on another container, a copy of the object will be created at that container.
This section discusses what you can expect to see when you right click on an object or instance in the Map View.
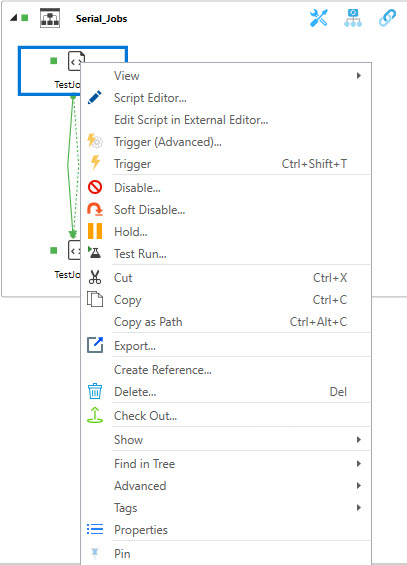
By right clicking on the selected object icon, depicted in the above image, you can perform various operations. These are the same operations you would see when right-clicking on an object in the Navigation pane.
Map View – Instance Operations (Completed)
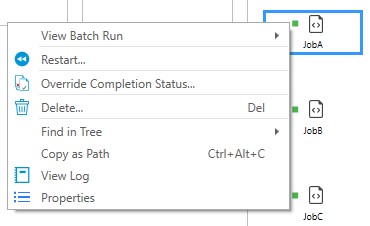
If you right click on the “Instance Icon” (as opposed to the object icon) you’re presented with a menu of operations appropriate for the state of the instance. For more details about instance actions you can perform - see Instance Operations
The menu below is appropriate for a completed instance.
Map View – Instance Operations (Active)
If the instance is active, the menu displayed becomes appropriate to that of an active instance. If you look closely at the image below, you will see that the Instance Icon (blue bar) becomes larger when the instance is active.
Optimize, which is short for Optimize Workflow, allows you to make changes to your workflow and determine whether the changes you make positively or negatively impact the time it takes for the workflow to complete.
Consider the following example.
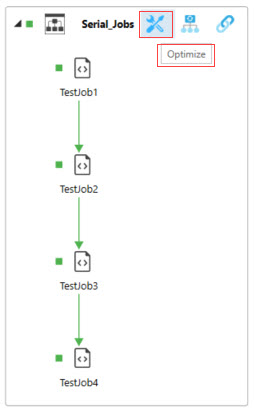
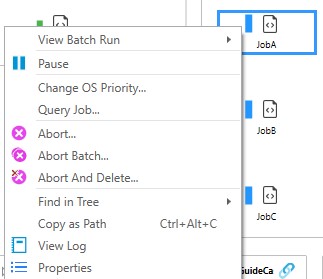
The plan above consists of three (3) jobs (JobA, JobB and JobC) that run simultaneously. However, due to a resource constraint, only 2 jobs can actually run at any one time. When they all complete successfully, JobD and then JobE run to complete the workflow. Clicking the stylized X in the upper right corner causes Map View to enter Optimize mode for that workflow.
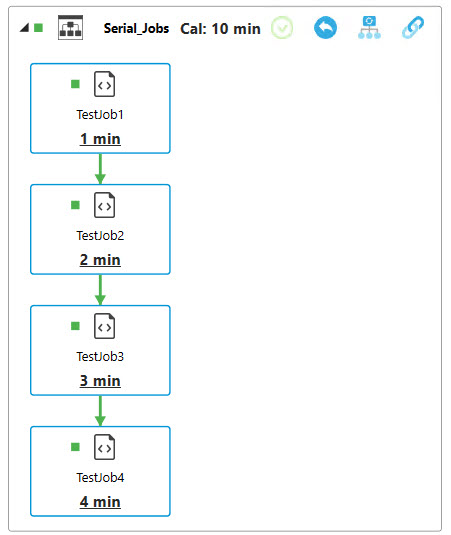
Optimize first calculates the Critical Path (CP) for the workflow. The CP is shown with boxes around those objects that denote the critical path.
Next, the average run-time is displayed for each object. The average run-time is the execution time of the object. This does not include the wait time.
The total time for the workflow is shown next to the plan in the upper left corner as “Cal”. In the above plan, the total calculated time is 38 seconds.
One last change is the Optimize icon itself. When in Optimize mode, that icon is replaced with 2 others: Commit and Undo. Any changes you make to this workflow as temporary until you commit your changes. This allows you to play around with the shapes and other aspects of the workflow without those changes actually taking effect. The way this is implemented is through an explicit checkout of the objects you’ve changed as you change them. Commit essentially becomes a type of selected check-in. Undo is essentially an Undo Pending Changes.
Invoking Optimize causes two (2) panes to appear: Object Data and Optimize Filters. Object Data displays the selected object’s performance metrics. This provides greater insight into how long the object has been waiting and executing. Optimize Filters allows you to highlight those objects that meet the filters criteria. The “criteria” portion is a dropdown that allows you to filter based on a performance metric and a value.
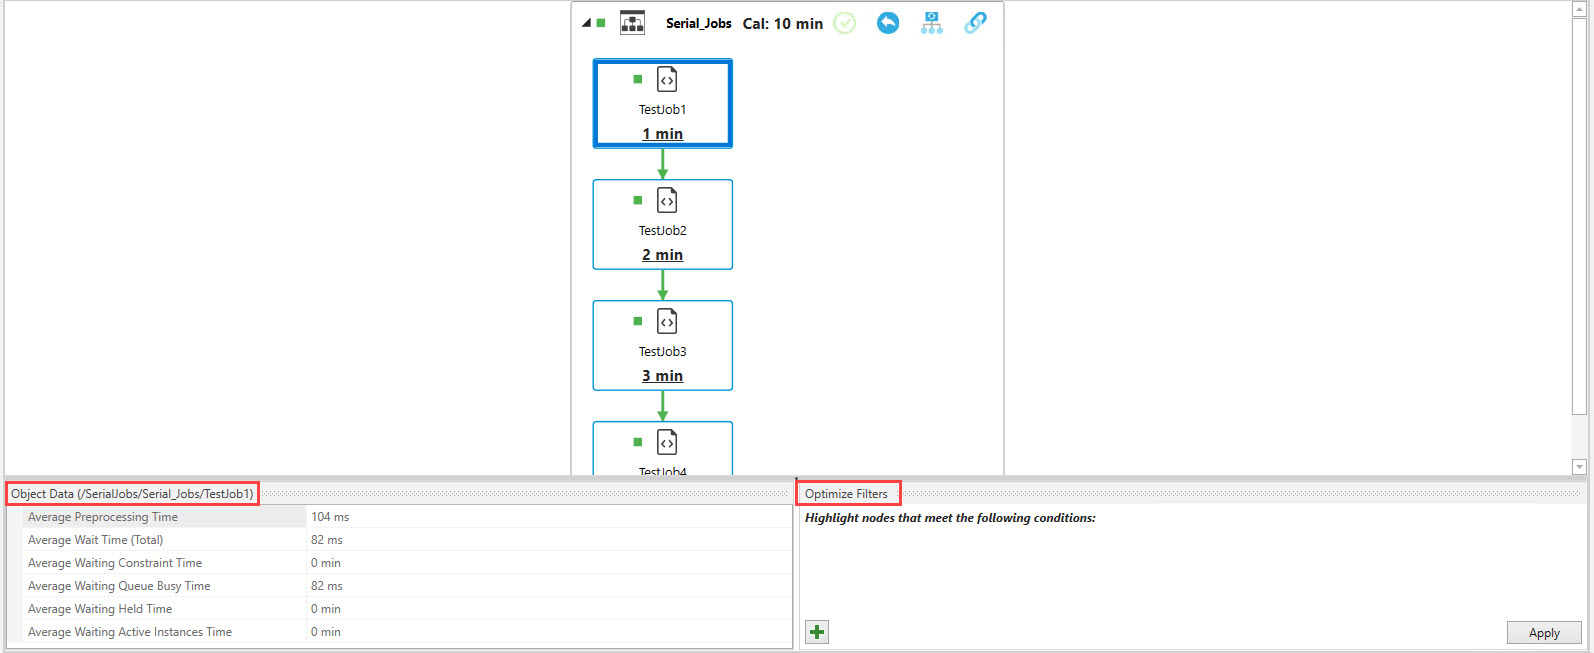
In the above example, this would allow you to highlight those objects that have an average wait time of more than 10 seconds.